
For today’s post, I’ve decided to do something a bit different from my usual posts – at least in subject matter. Or, as far as the platform goes? This is still going to be about books and sharing my love for books with people – just on Instagram, or more appropriately: bookstagram.
I’ve really, really been enjoying taking pictures for my bookstagram account for the past few months and since it seems to be working quite well for me, I figured I would share how I do it in case any of you guys want to try your hand at bookstagramming too? I also have a post with a ton of tips and tricks planned for next week that’s going to give you even more information and hopefully take away any concerns you might have about what you need to do or have!
But for now, let’s just get into the picture taking side of things – I’ll take you from setting up my shot all the way through editing and posting.

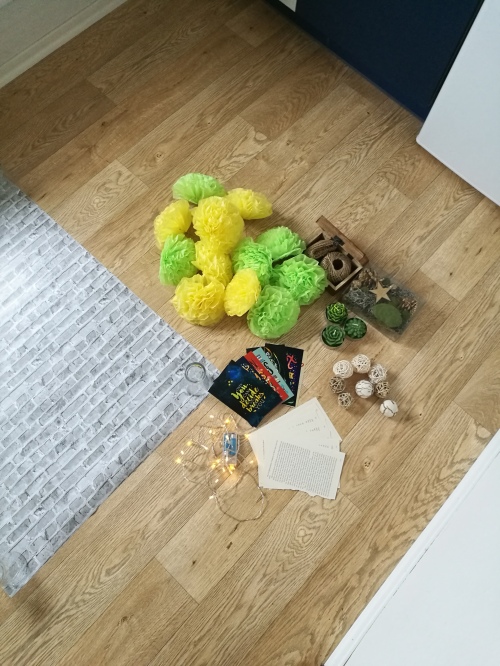
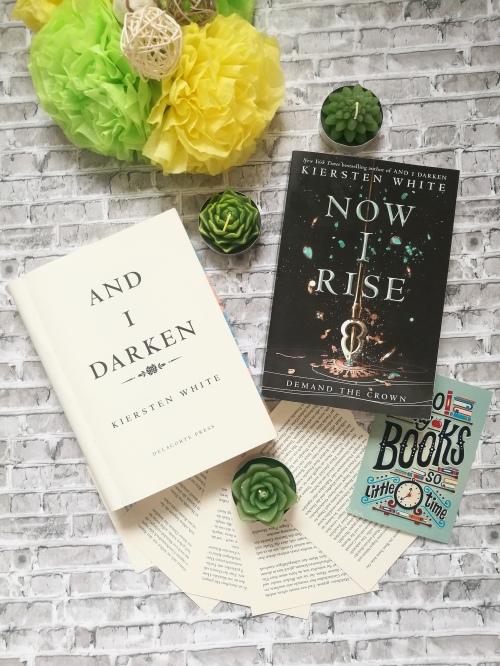
I learned very quickly that it’s much easier and quicker to take multiple different pictures when you have the props you want to use within arm’s length. So what I do is put down my background (it’s a 1.50€ roll of a fake brick background I got a couple of weeks ago) and collect any and all props right next to it and just out of shot. And you don’t need any props when you’re just starting out – or at all if that’s not something you want.
I currently use
- flowers I made out of paper towels (is that what they’re called?)
- ripped out book pages (they are from a really old book I wasn’t going to read anymore and wanted to repurpose)
- plant looking candles (they were a DEAL and I couldn’t resist getting them… yes, my wallet regularly cries)
- printed quotes
- fairy-type of lights (I’ve had them for years now)
- other decorative items found around my apartment
But something I really want to put an emphasis on is the fact that you don’t need to buy any probs or use them for your pictures. If you go back on my bookstagram you’ll see that I started out using just the books I owned (which, yes you either have to buy or borrow from the library or your friends – thanks Sandra, for being aboard this!) and that flower in the white pot in the picture beneath. That orchid has been the sole prop in so many of my bookish pictures and it’s been with me for over two years now.
I am almost embarrassed for you guys to see the next picture but that’s just real life and what my set up looks like (especially the surroundings that you don’t see in the picture – excuse the things on the heater and windowsill) whenever I take pictures.
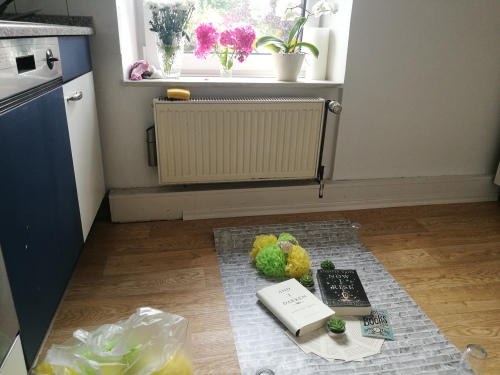
For me, the best place to take pictures is in my kitchen as that’s where I have both the best light and most space to set up everything. Plus, I can take a picture in there at either noon or 9pm and they’ll still turn out really well! Can we please appreciate the fact that some glasses are holding down my background? Because that’s just the reality of things – once again. xD
And as far as setting everything up for the picture – you just have to play around with your book(s) and whatever else you want to use. I’ll often try a few different things, take the picture, edit it to make sure I like the final result and move stuff around if I have to.
Below, is what I ended up with for the particular picture we’ll use as an example for this blog post.
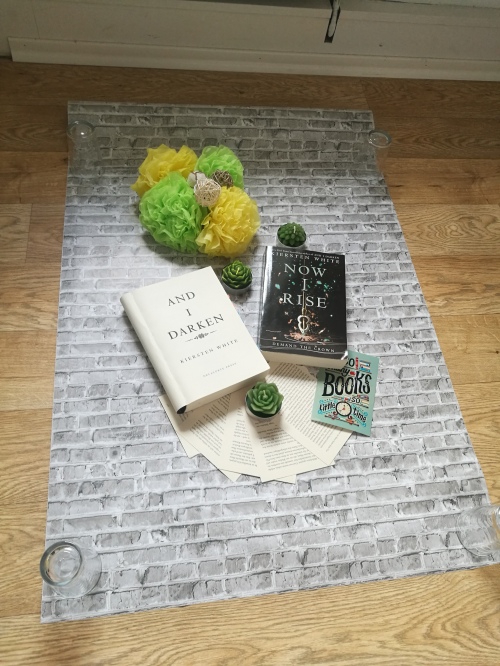
Once everything is set up and I like the way it looks at first glance, I’ll start taking the picture. And I don’t use a fancy camera for this or anything, just my phone (which is a Huawei P9 with a 13MP camera). I always make sure to take multiple pictures of the same set up before I move on to different angles.
Here’s what the picture I ended up taking looked like before I did any editing to it.
My phone has this setting, where when I click on the part of the picture that I want in focus, it’ll adjust the lightning to make sure everything is clearly visible, that’s all that’s happened above so far. Once I’m happy with the pictures I’ve taken, I take things straight into the Instagram app – that’s all I use for editing my pictures.
At first, I was going to tell you guys how I edit my pictures but I figured it would be much easier to just show it to you so I recorded my screen while editing the picture shown above. I can’t figure out how to make the video player itself smaller, so you might have to zoom out quite a bit to see it all – I apologize for that.
I will usually do everything almost exactly in the way I show above (though it was my second recording as I had my music turned on for the first – I wasn’t aware the app recorded that too) so things might be a bit out of order after I apply the filter.
But with those things, it often comes down to what your picture looks like anyways and you’ll have to mess around with the settings until you’re happy with the results. I can just show you how I do it and what I like for my own pictures. It’s up to you individually to take from that what you want to. 🙂


Here are both pictures side by side for you guys to see the difference that editing made – which isn’t really that much but I love it a lot.
Something I’ve learned over the course of the past few months is that it’s okay to play around with your set up, your theme and filter. I find that I’m much more motivated to take new pictures now than I was before when I set on a theme/filter. Don’t limit yourself!
Phew, okay. This actually turned out to be so much more stress than I thought it would be? Especially because the video player just won’t work with me the way I want it too. xD But! We’ll just ignore that for now and just concentrate on what I did get done: tell you guys how I take and edit my pictures! Are you guys on bookstagram too? And if so, what’s your process like? Let me know down in the comments below! I can’t wait to hear all about it. 🙂


Yes this is the post I’ve been waiting for! 😍😍😍 I was so curious to see your bookstagram process and I’m relived that it seems pretty manageable! I don’t think that I’ll ever get into bookstagram, but I certainly want to try to take more artsy pictures of my books to share 🙂 I usually edit my pictures with the app Moldiv, which is really great, it offers a good range of options (and a good amount of free filters) and you can do a lot with it! Sadly, it recently started acting up and crashing as my phone’s software isn’t updated any longer (curse you Apple!) and the app’s updates require a newer software 😮
LikeLiked by 1 person
It’s definitely quite manageable, I would say! And it doesn’t take me a lot of time from start to finish for one picture either. 🙂 I’ve never heard of that app, but I’ll look into it because I love trying new ones! ❤
LikeLiked by 1 person
Love this! I try and bookstagram but I do find it hard to find the time and the right light!!!
LikeLiked by 1 person
The right light can definitely be quite the struggle! I kept going back and forth between different setups too until I landed on what I use now!
LikeLiked by 1 person
I have been so slack on Insta lately. I said to myself that, after the school holidays have finished, I need to get back to it!
LikeLiked by 1 person
Yeah, I go through phases sometimes too, not gonna lie! I hope you’ll be able to get back into it if it’s something you enjoy doing!
LikeLike
I do and thank you 😘
LikeLiked by 1 person
Wow this post is awesome! Thank youuuuuuu 💞💞💞💞💞 my instragram is quite ughh, my pictures are crying for a better photographer 😂😂
LikeLiked by 1 person
You’re welcome! And honestly, it just takes practice and I feel like my Instagram feed definitely shows that. I’ve been through a bunch of different ‘styles’ and setups and I’ll 100% continue to try different things. 🙂
LikeLiked by 1 person
Thanks for sharing your tips with us!!!
LikeLiked by 1 person
You’re welcome! ❤
LikeLike
This was so great to read! I’ve been thinking of starting a Bookstagram lately but I don’t know .. thanks for the tips!
LikeLiked by 1 person
You should absolutely give it a try! I started off by just posting regular photos of what I was up to (which is why I have more than a thousand photos on that account already…) and then slowly integrated books into my feed until I switched over entirely! If you do, make sure to leave me a link. 🙂
LikeLiked by 1 person
Thanks for the encouragement! You’re such a sweetheart 🙂
LikeLiked by 1 person
This is super cool to look at! It makes me think about how I could rework the way I do bookstagram!
LikeLiked by 1 person
I honestly find that surrounding yourself with a bunch of different types of accounts really helps inspire you to want to try different things and styles!
If you use bookstagram regularly already, something I do is save pictures that I really like as they pop up on my feed because it gives me an idea of what I could also try or just a general idea of ‘Oh, you really like brighter pictures’ or ‘You really like color-coordinated pictures!’ which is super helpful when you feel stuck! 🙂
LikeLiked by 1 person
I just started experimenting with bookstagram but am feeling rather discouraged because I don’t have anything I can use for props and tend to prefer minimalistic instagrams anyway. It seems like most of bookstagram is more into accounts that utilize a ton of props though, so it’s a little frustrating atm. It was cool to see how you set up your photos; I’ll definitely be thinking about using some of your tips to see if I can improve mine 🙂
LikeLiked by 1 person
I 100% understand where your discouragement comes from but you honestly don’t need props! There’s a place for the entire spectrum of the amount of props people use for their pictures! Some of my favorite pictures that I’ve saved are just simple shots of a book (sometimes just a pretty chapter header!), the book’s spine or the books in a series in front of a blank white wall. I know it may seem like you need to use all the props and those pictures definitely get a ton of likes (not gonna lie, they ARE beautiful AF) but you don’t have to do what everyone else does! 🙂
If it’s any help, I’ll be posting another bookstagram related post tomorrow with a bunch more tips that I’ve learned!
LikeLiked by 1 person
awesome! I look forward to reading it!
LikeLiked by 1 person
such a fun behind the scenes!
LikeLiked by 1 person
Thank you, Emma!
LikeLiked by 1 person
My goodness, this is so useful!! It really helps to see that you have an actual background that you lay on the floor and use. Usually I just use my bedspread or something lmao.
When you’re taking pictures, do you ever find that your shadow falls on the picture? Or your phone’s shadow? That’s always my problem!
LikeLiked by 1 person
Thank you for your sweet comment, Hadeer! I’ve only recently started using that background though and would use my floor as the background before that. But due to its color, it often changed the entire color of the picture itself too. Having the brick wall background definitely helps a lot with having a consistent base image that isn’t too yellow or anything. 🙂 Also, I LOVE pictures of books in bed! But I have colorful spreadsheets which don’t quite work the way I want it too, plus the light isn’t as good on my bed. xD
Not really, but that’s mainly because I am opposite the window and don’t block out any of the light or give it a chance to create a shadow. But I used to include some flowers in my pictures for a while and those would 100% create a bit of a shadow until I realized that I needed to position them differently. xD
And as far as my phone’s shadow – I don’t have that exact problem. But with the more shiny covers, you’ll sometimes end up being able to see me on the book’s cover which is kind of annoying but also hilarious.
LikeLiked by 1 person
I love seeing behind the scenes stuff like this 🙂 Thanks for sharing! I’m on Bookstagram too (though it’s been ages since I’ve posted anything), and sometimes I feel like a doof because the picture taking process is so un-glamorous, haha. Glad to see that’s just the way it goes!
LikeLiked by 1 person
I’m so happy to hear you enjoyed the post, Rebeccah! Hahahahaha, there’s definitely nothing glamorous about the picture taking part, at least on my end! Maybe it’s different for someone else! 🙂
LikeLike
Your photos are so, so beautiful! I have a bookstagram, but I can never take good layout photos. I love all your props!
LikeLiked by 1 person
Aww, thank you so much Vivian! And I have to say, it does take quite a bit of trying out different things and layouts until you find something that works well for you, so don’t give up just yet! ❤
LikeLiked by 1 person